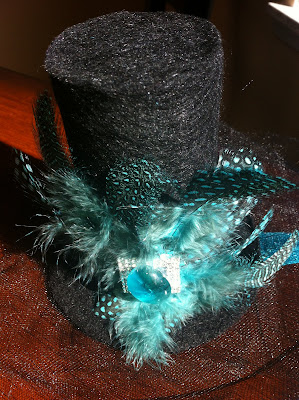
 So I got invited to go to a women's tea for "food, fun and fellowship." The only catch was you have to wear a tea hat. So today is the "tea" and I made a hat.
I made sure to do it while the hubby was out and put up all of the supplies before he got home. It took me about 30-40 minutes during nap time for my one year old.
When I think of tea hats I think of the Mad Hatter tea party in Alice in Wonderland. So with that in mind here is what I did.
It was made out of felt, poster board scraps, hot glue, elastic headband,
feathers, tulle, ribbon, leftover "bling" from a wedding invite I received and a glass rock. I had everything except for the feathers and headband which I picked up at the local hobby store.
First I cut a 4 inch diameter circle for the rim out of poster board and black felt. I cut the poster board slightly smaller than the felt. Then I hot glued them together to add strength.
Next I cut a 4 in by 6 inch rectangle out of felt and poster board for the "top hat" part. Cut the poster board slightly smaller again and hot glue them together. Making sure the felt is on the outside, make a cylinder and hot glue the ends over lapping slightly.


Next cut a 2 inch circle with the felt and poster board just like the others. This will go on the very top of the hat. Once the 2 in circle is glued together, it is time to assemble the hat.
You may need to trim the edges a little to fit before your glue everything

together. To assemble the hat put the rim circle on the bottom, felt side up. Next, squeeze hot glue over all of the edges of one side of the cylinder. Center the glued side on the rim and hold until the glue is cool. Then, squeeze hot glue over the edges of the other side of the cylinder. Place the 2 in top, felt side up, on the glue. Hold until cool.
Now that the hat is glued together, it's time to decorate! The front of the hat is the side opposite of the seam made from making the cylinder.
First I cut 1" ribbon 6 1/2 in long. This will be the band around the bottom of the hat. Attach it with hot glue, slightly overlapping on the back of the hat by the seam. Next add "bling." Bling can be anything like a button, an initial or old earring or a buckle with fake diamonds, like I used. Hot glue and Center the "bling" in the middle of the hat band on the front of the hat. Add feathers, with hot glue, how you like them behind the "bling." Last I added a glass rock to the front of the bling, with hot glue, to hide some of the feathers.
Now for the headband and tulle. I cut 3 - 6 in x 14 in strips of tulle. Turn the hat over so that the bottom poster board of the brim is showing. Squeeze hot

glue around the perimeter of the bottom circle. Lay the first strip of tulle centered on the glue, Pulling downward on each side of the tulle strip so the the glue comes through

the tulle. Continue to the lay the other two strips of tulle making sure to surround the hat equally with the tulle. You may need to add more glue between the layers. Next add hot glue to the elastic headband. I used 1/2 in headband and squeezed a 1/2 x 1/2 in square of glue on the headband.
Press down in the center of the circle until I is cool. Cut another 4 in circle out of felt with the center cut out. Feed
the headband thought the cut out part of the circle and hot glue the rest to the hat. Press together good and hold until it is cool. Ta Da! This finishes the hat an makes it look all put together.
Be creative! Use different colors! And always use your
hands!
Patty
